Every asset on a food production floor sits in one of four risk zones, and that single classification decision determines the material spec, the cleaning frequency, and the maintenance interval assigned to it. Get the zone wrong and a conveyor bearing housing ends up inspected like a filler nozzle, or a filler nozzle gets left with the same annual glance a floor-mounted motor bracket receives. Auditors reviewing HACCP, SQF, and FSMA programs check zone logic early because it shows whether a maintenance program understands risk or is running one generic PM template across every asset regardless of contact level. OxMaint builds zone classification into the asset record itself, so PM intervals, material specs, and inspection checklists generate automatically from Zone 1 through Zone 4 instead of being assigned by guesswork. Ready to see it mapped against your own equipment list — start a free trial and classify your first assets today, or book a demo to walk through the zone logic live.
Food Safety Zone Classification: Turning Food Contact, Splash, and Non-Contact Zones Into a Working PM Program
A practical guide to classifying plant equipment into Zone 1 through Zone 4, and how that classification should drive material specification, cleaning frequency, and preventive maintenance intervals — not sit as a forgotten line in a HACCP binder.
What Zone Classification Actually Means for Maintenance
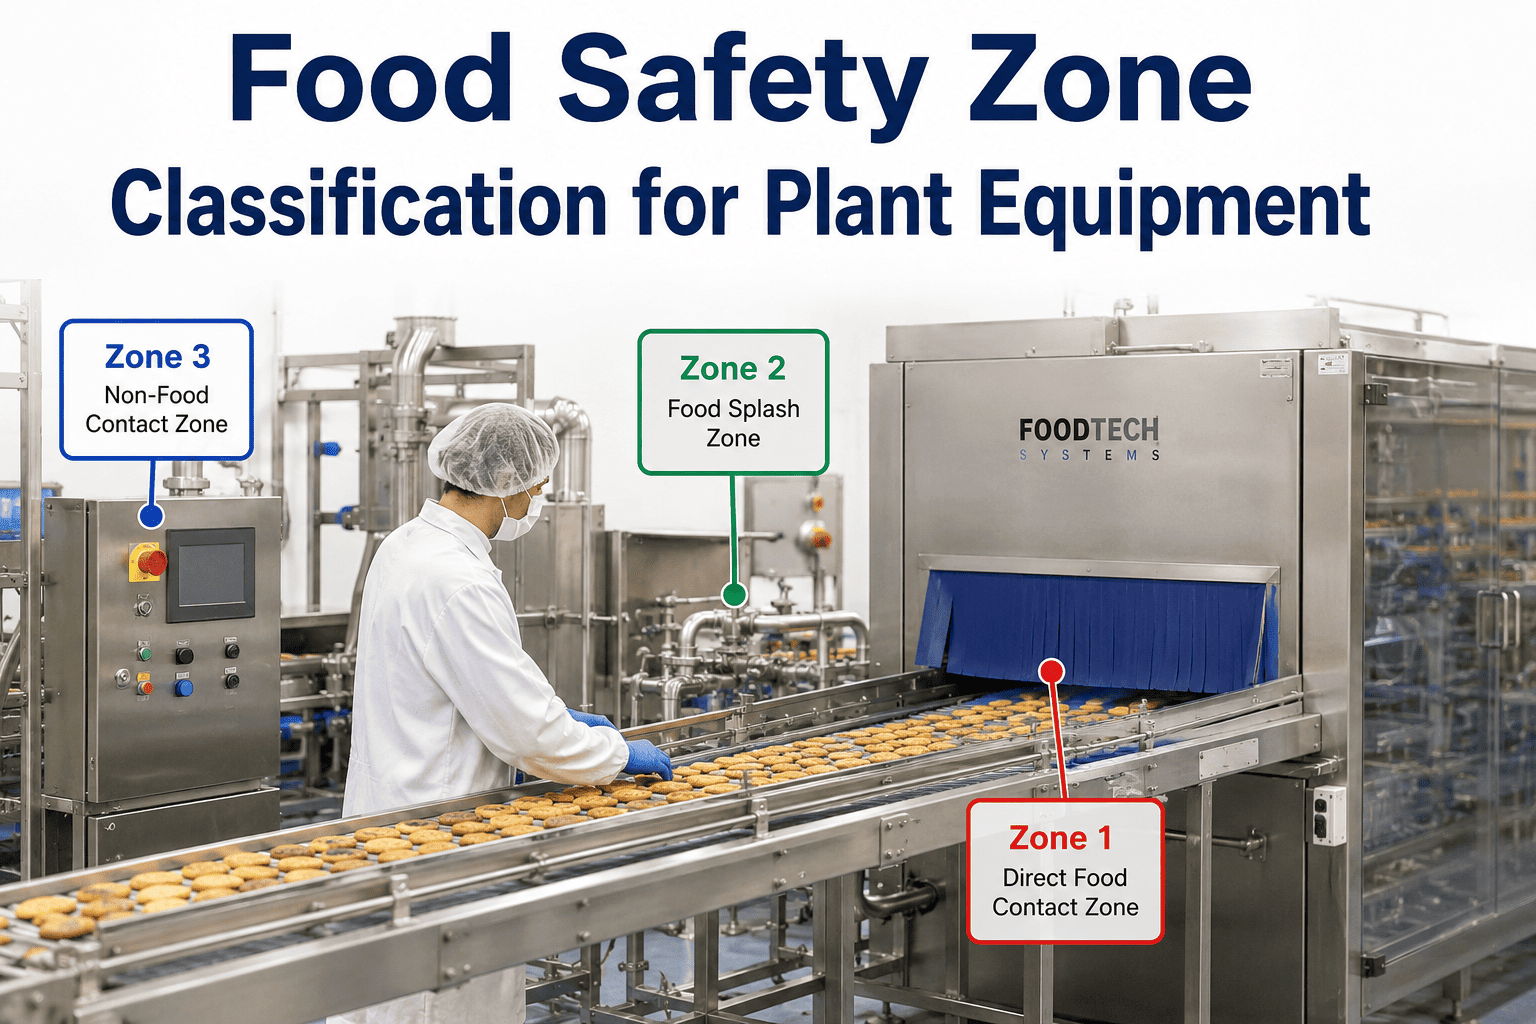
Zone classification is a risk-mapping exercise borrowed from HACCP and hygienic design standards, and it groups every surface in a plant by how directly it touches food. Zone 1 covers surfaces in direct or indirect food contact — hoppers, blades, conveyor belts, filler nozzles — and carries the strictest material, finish, and cleaning requirements of any equipment class. Zone 2 covers splash and spill areas near production, where equipment gets soiled by drips and overspray but never touches product directly. Zone 3 sits further back inside the processing room — motor housings, gearboxes, drive components — where dust and dirt are the concern rather than direct contamination. Zone 4 is everything outside the processing footprint: docks, corridors, maintenance shops, and storage. The mistake most plants make is treating this as a one-time sanitation label instead of feeding it into the CMMS as a maintenance driver.
Once an asset carries a zone tag, that tag should decide three things automatically — what material and finish the replacement parts must meet, how often the surface gets inspected and cleaned, and what documentation the work order needs to satisfy an auditor. A Zone 1 filler valve and a Zone 4 pallet rack are not the same maintenance problem, yet plants running paper PM schedules frequently give both the same generic monthly inspection card. OxMaint stores the zone as a field on the asset record itself, so schedules, checklists, and material specs pull from the classification rather than from whichever technician happens to build the PM that week. See how zone-driven scheduling looks against your own asset list — book a demo to walk through it.
Classify Your Equipment Once. Let the Zone Drive Every PM After That.
Tag each asset by zone during setup and OxMaint applies the correct inspection frequency, material spec reference, and audit documentation automatically — no separate spreadsheet to maintain alongside the CMMS.
The Four Zones, Risk Level to Maintenance Load
Material and Finish Spec by Zone
Assigning the wrong material spec to the wrong zone is one of the most common and most expensive mistakes in food plant maintenance — either over-specifying costly food-grade stainless where it is not needed, or under-specifying it on a surface an auditor will swab. The table below reflects the material and finish logic most hygienic design standards apply once a surface is placed in its correct zone.
| Zone | Typical Material | Surface Finish | Inspection Cadence |
|---|---|---|---|
| Zone 1 — Food Contact | 304 / 316 stainless, food-grade polymer | Ra ≤ 0.8µm, No. 4 polish | Every shift, passivation 60-180 days |
| Zone 2 — Splash / Spill | 304 stainless or coated aluminium | Cleanable, wash-down rated | Weekly with corrosion check |
| Zone 3 — Non-Contact, In-Room | Painted mild steel, standard housings | Sealed against dust ingress | Monthly seal and housing check |
| Zone 4 — Remote / Unexposed | Standard industrial construction | No food-grade requirement | Quarterly or annual |
Where Zone Logic Breaks Down on the Plant Floor
Preventive Maintenance Load by Zone
How OxMaint Runs Zone-Based Maintenance
Frequently Asked Questions
How is Zone 1 different from Zone 2 in practice
Zone 1 surfaces touch food directly or receive drainage that touches food, so they require food-grade stainless, a smooth finish, and shift-level cleaning verification. Zone 2 surfaces get soiled by splash or spray near the line but never contact product, so they need to be cleanable and wash-down rated without the same finish requirement. Learn more when you book a demo of the zone logic.
Can OxMaint assign zone classifications automatically
Zone classification itself is a plant engineering decision based on the equipment's contact with food, so your team assigns the initial tag. Once set, OxMaint uses that tag to generate the correct PM intervals, material specs, and documentation automatically for every asset in that zone.
Does zone classification apply to plastic and non-metal equipment
Yes — zone logic applies to any material in contact with food, including food-grade polymers, rubber gaskets, and composite components. The zone determines whether the material must be non-absorbent and corrosion resistant or simply durable and cleanable.
How often should Zone 1 equipment be passivated
Most Zone 1 stainless assets are passivated every 60 to 180 days depending on duty cycle and chloride exposure from CIP chemistry. OxMaint can trigger passivation work orders by calendar interval or by CIP cycle count, whichever threshold is reached first.
How quickly can we set up zone-based PM schedules
Most plants tag their core asset registry by zone and have working PM schedules live within two to three weeks using pre-built templates. Start a free trial to begin classifying your own assets today.
Four Zones. One System. Every Asset Maintained to the Risk It Actually Carries.
Stop running the same PM template across every surface in the plant. Classify by zone once and let material specs, inspection cadence, and audit documentation follow automatically.